Witchaven Walkthroughs
Walkthroughs for the levels. I have noted secret and secret-like areas where I am aware of them, but the Witchaven games do not have an official secret tally the way many oldschool FPS games did. There may be some that I have missed. For some levels, I have assumed continuous play (with items and XP levels carried over) when giving my instructions.
Due to the buggy nature of these games, you may want to keep multiple saves as you progress.
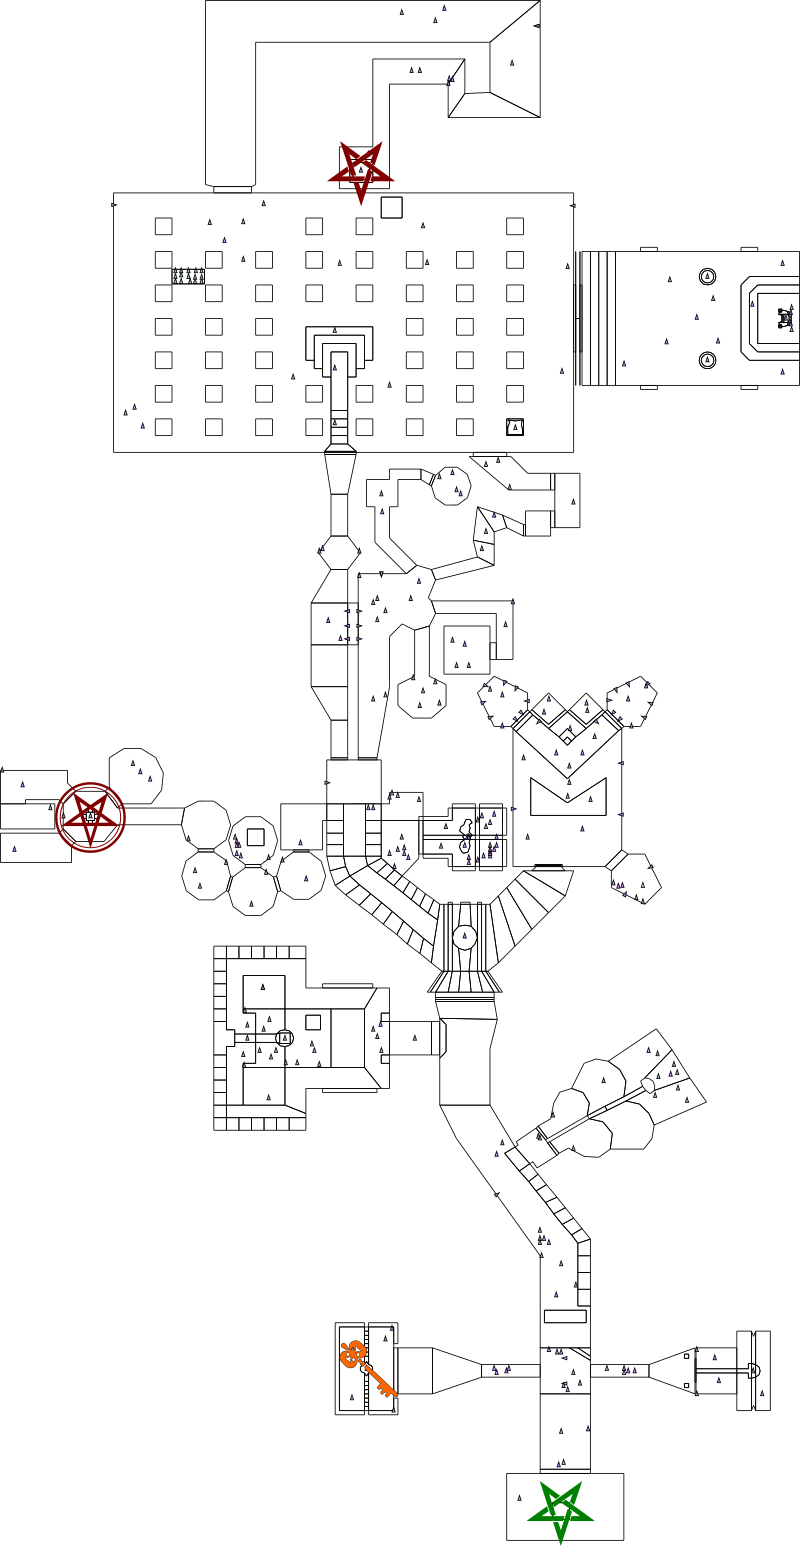
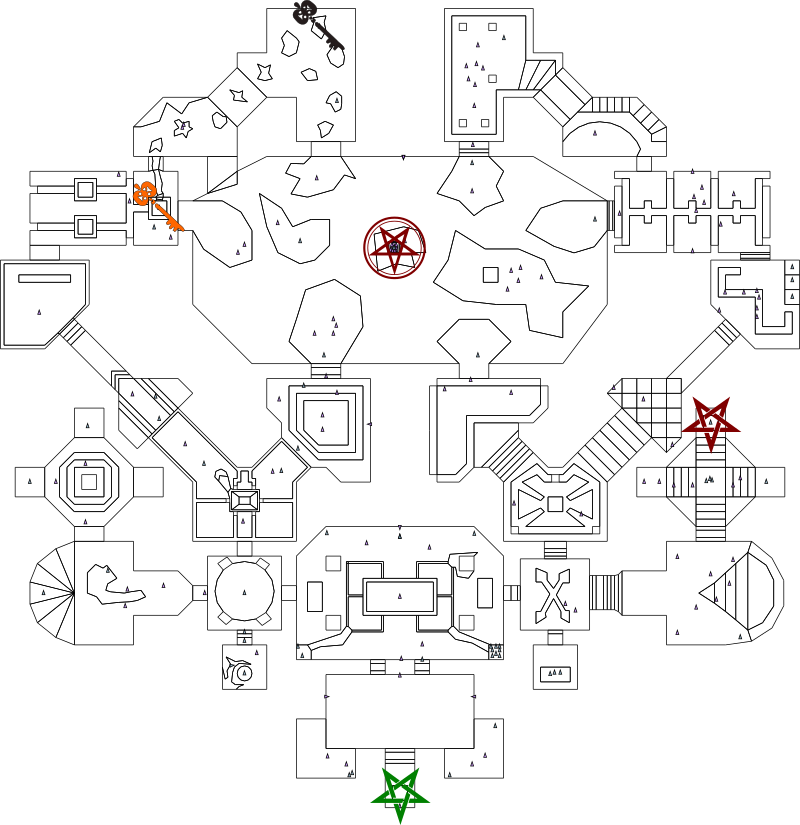
Maps are included for every level, with the most vital places and objects marked. The marks used are as follows:
Witchaven I walkthrough
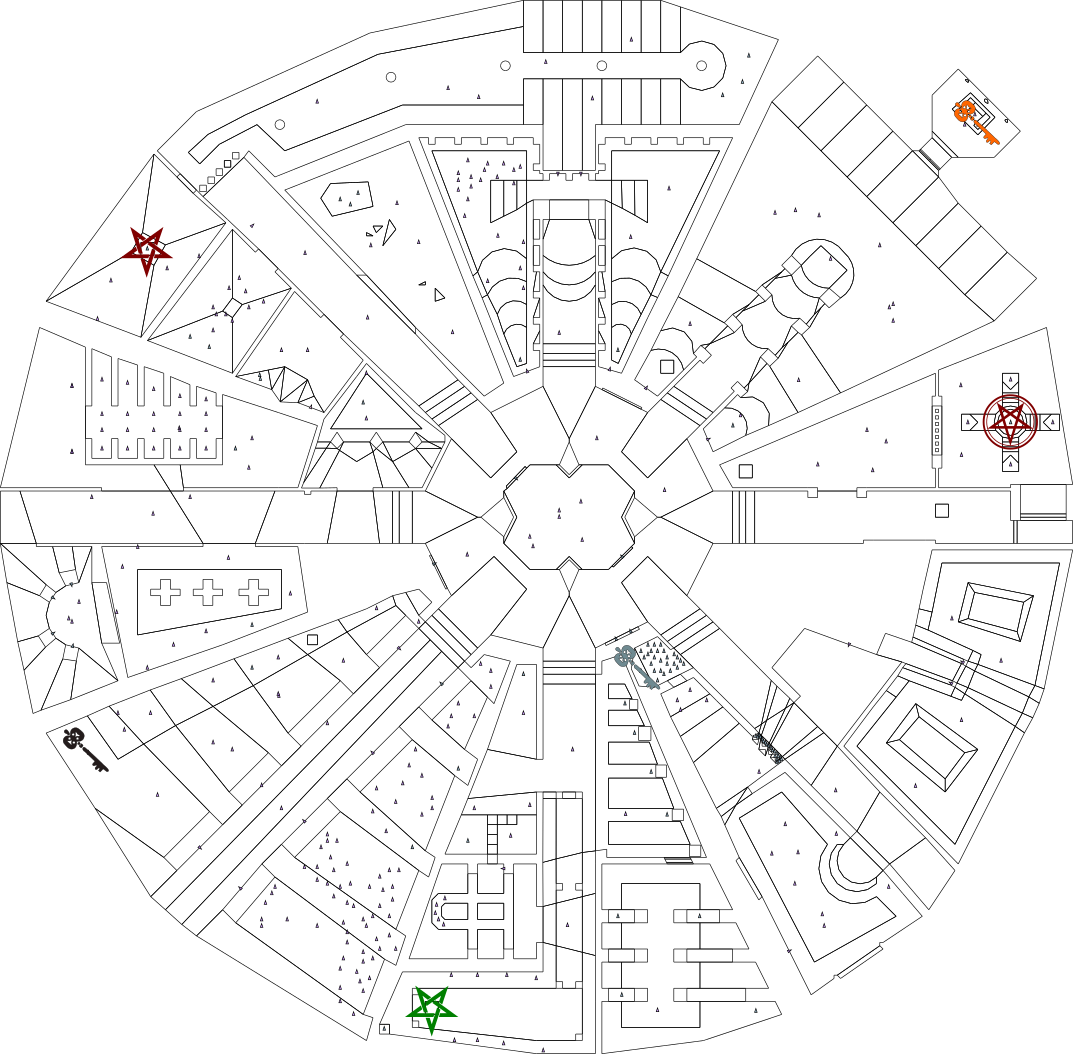
Level 1:
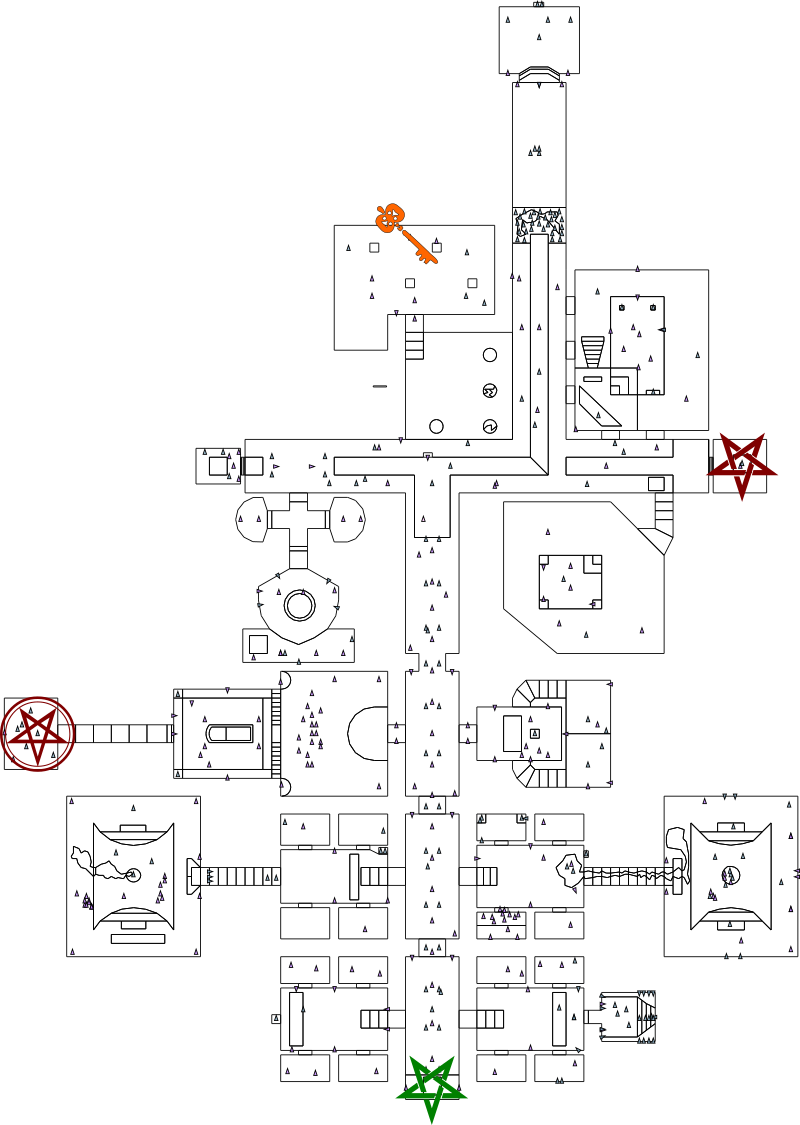
This is a fairly short starting level, but there are a few side areas and alternate routes to keep things interesting. From your starting location, proceed to the open area with cracked, volcanic ground. Beware as stepping over the lava cracks will drain your health rather quickly. The goblins in this area will fight against each other, so you can let them do most of the killing (you won't lose XP for doing so). Once the area is cleared, you can go through the big door and down a short bent corridor. To your left is a side area with a morning star and hidden armor, to the right you can continue to progress. Continue through the room with the ogres, checking the barrels for more supplies if you wish. Once you reach the long corridor, there are two ways you can go; the obvious one being straight ahead to a wooden platform with an elevator box. Go inside the box and hit your use key to make it descent, then carefully cross the bridge. When you grab the goodies near the lava, a door opens behind you revealing a Mino Drake who is the most dangerous enemy you've faced so far. If you continue to follow the obvious route, up the stairs, you'll find yourself in a room with goblins and a large wall decoration. From there, go down the dark stairs to what seems like a dead end, but is actually a secret door you can open. You'll soon find a large water room with the pentagram suspended over a raging fire. You'll get burnt when you walk through so you may wish to use fire resistance or else run through in a hurry. Proceeding further, you'll find a large gate which can be opened, leading through a lava chamber where you may also wish to use fire resistance if you have it. The exit pad is a short way away to the northwest.
Tips and secrets:
- In the cracked lava area near the start, there is a pit in the east wall that you can descend into to find a chamber with some red ogres and goodies including a sapphire ring. You will need fire resistance to safely get in and out of here.
- In the water cave that you find when taking the left door in the first indoor hallway, you can walk through the waterfall behind the morning star. There is leather armor there.
- The well with the strength potion over it has a spike in the bottom. Getting the potion is possible by jumping across the well, but probably only if you have the settings right for jumping not to be too bugged.
- In the room with the skeleton, there is a secret passage in the south wall that offers an alternate route towards the pentagram room.
- There's a secret door behind the Mino Drake that you encounter after the elevator section.
- Using fire resistance to explore the lava pool near the Mino Drake's area will net you leather armor and a health potion, as well as an alternate path to the pentagram room.
- Near the exits from the alternate routes from the skeleton secret passage or the lava cave, there is a chamber you can crouch into with a shield, healing potion and a night vision scroll.

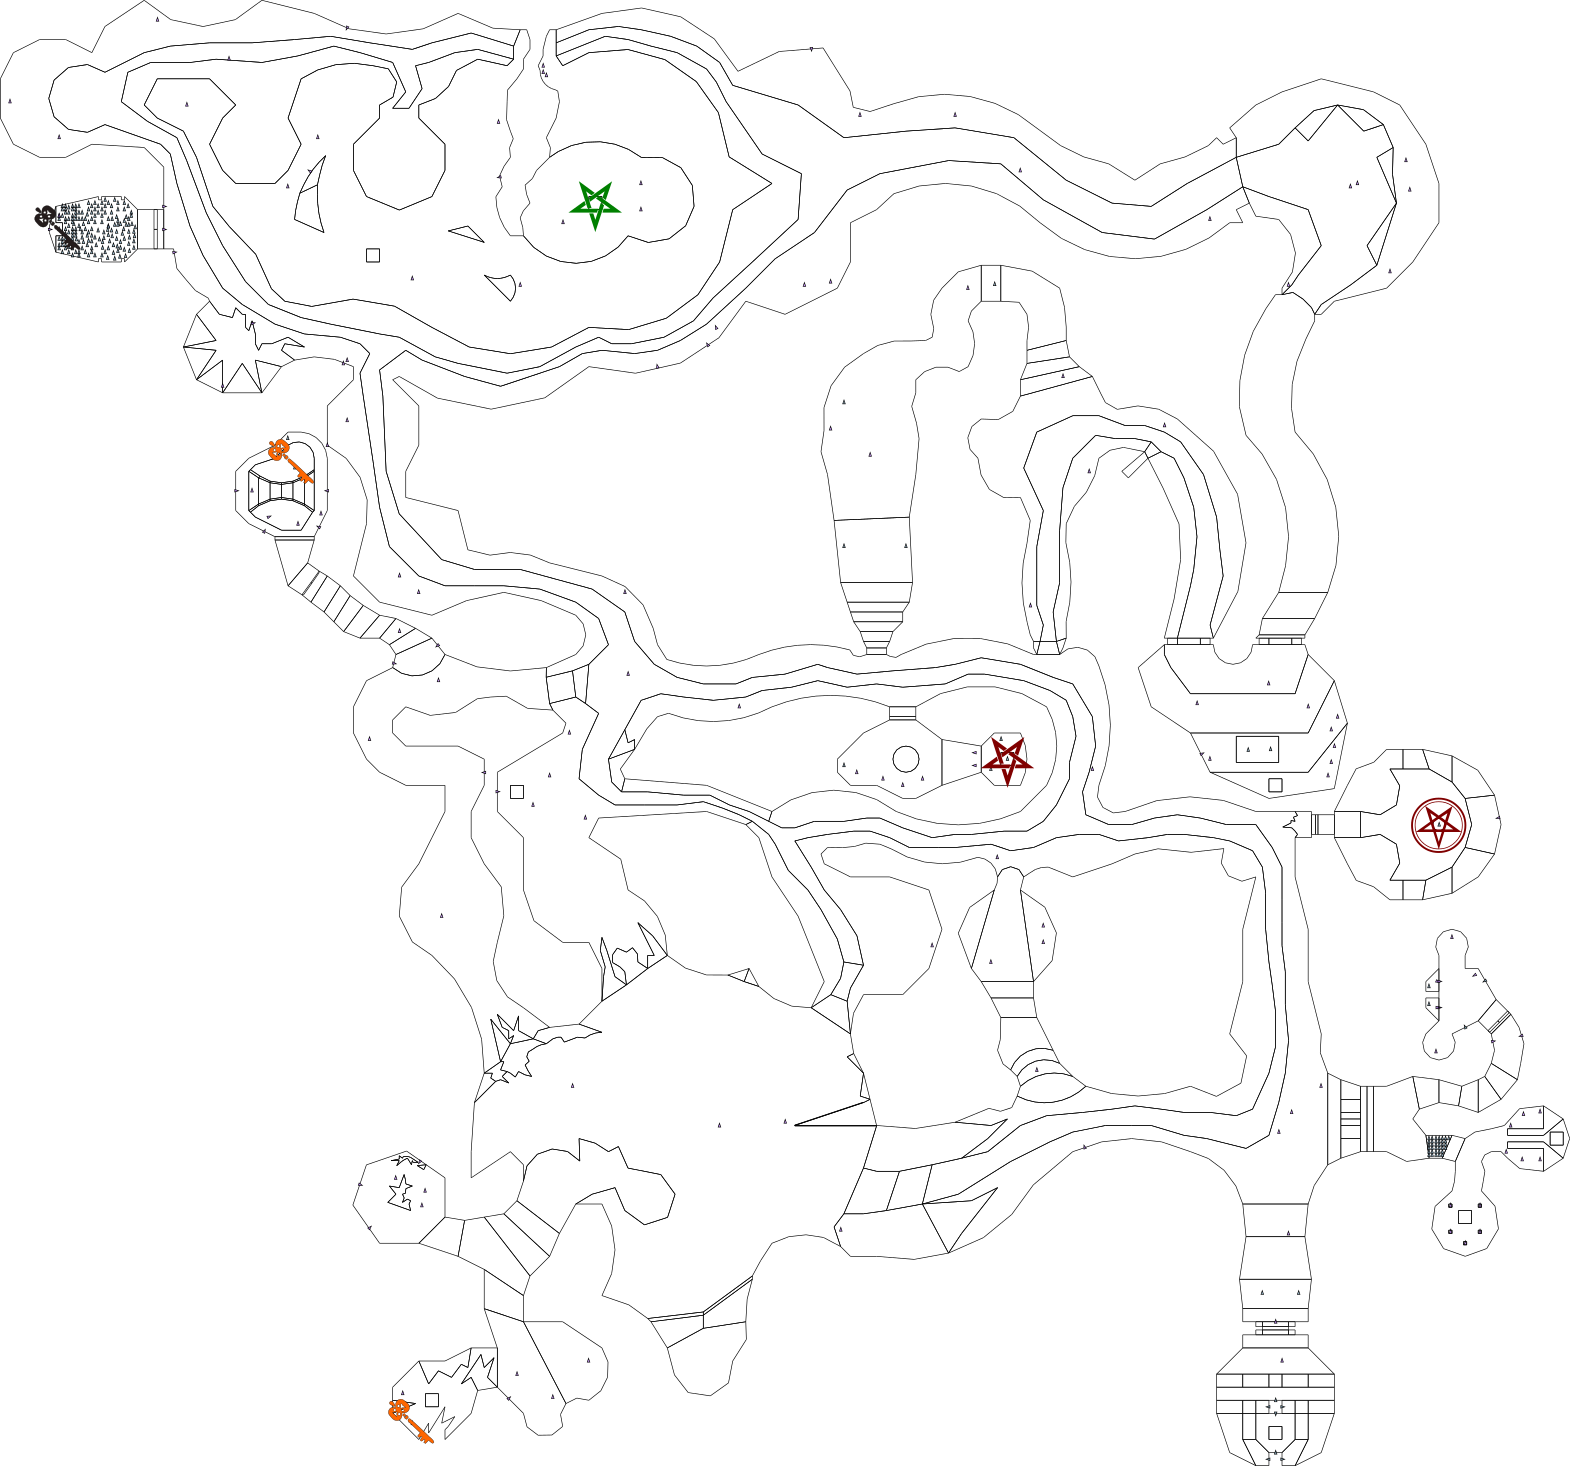
Level 2:
From the start, go up the spiral stairs and eastward to the big water area. Near a spike pit in the water, you'll see a passageway with a couple of potions. Head through it and carefully navigate the narrow path between pits full of lava and spikes. In the lava room west and north of where this passage comes out, find the black key guarded by a Lava Fiend. Now head up the stairs that loop back towards the square room near the start, crossing the bridge between the water areas. In the square room, the walls drop and two Mino Drakes emerge. Behind one of the Mino Drakes is a red door through which you will find the pentagram room. Now that you have the pentagram, head to the southwest part of the map and through the black key door to the exit.
Tips and secrets:
- In the southeast area of the map, there's a secret door in the wall of one of the corridors, which shows up red on the automap. Through it you can find a couple of rooms with goodies including the bow.
- In the far west of the map, near the bridge across the pit of lava and spikes, there is a corridor with two secret doors. The one at the end contains a quiver and some potions; taking them reveals another closet with a couple of ogres and a treasure chest.
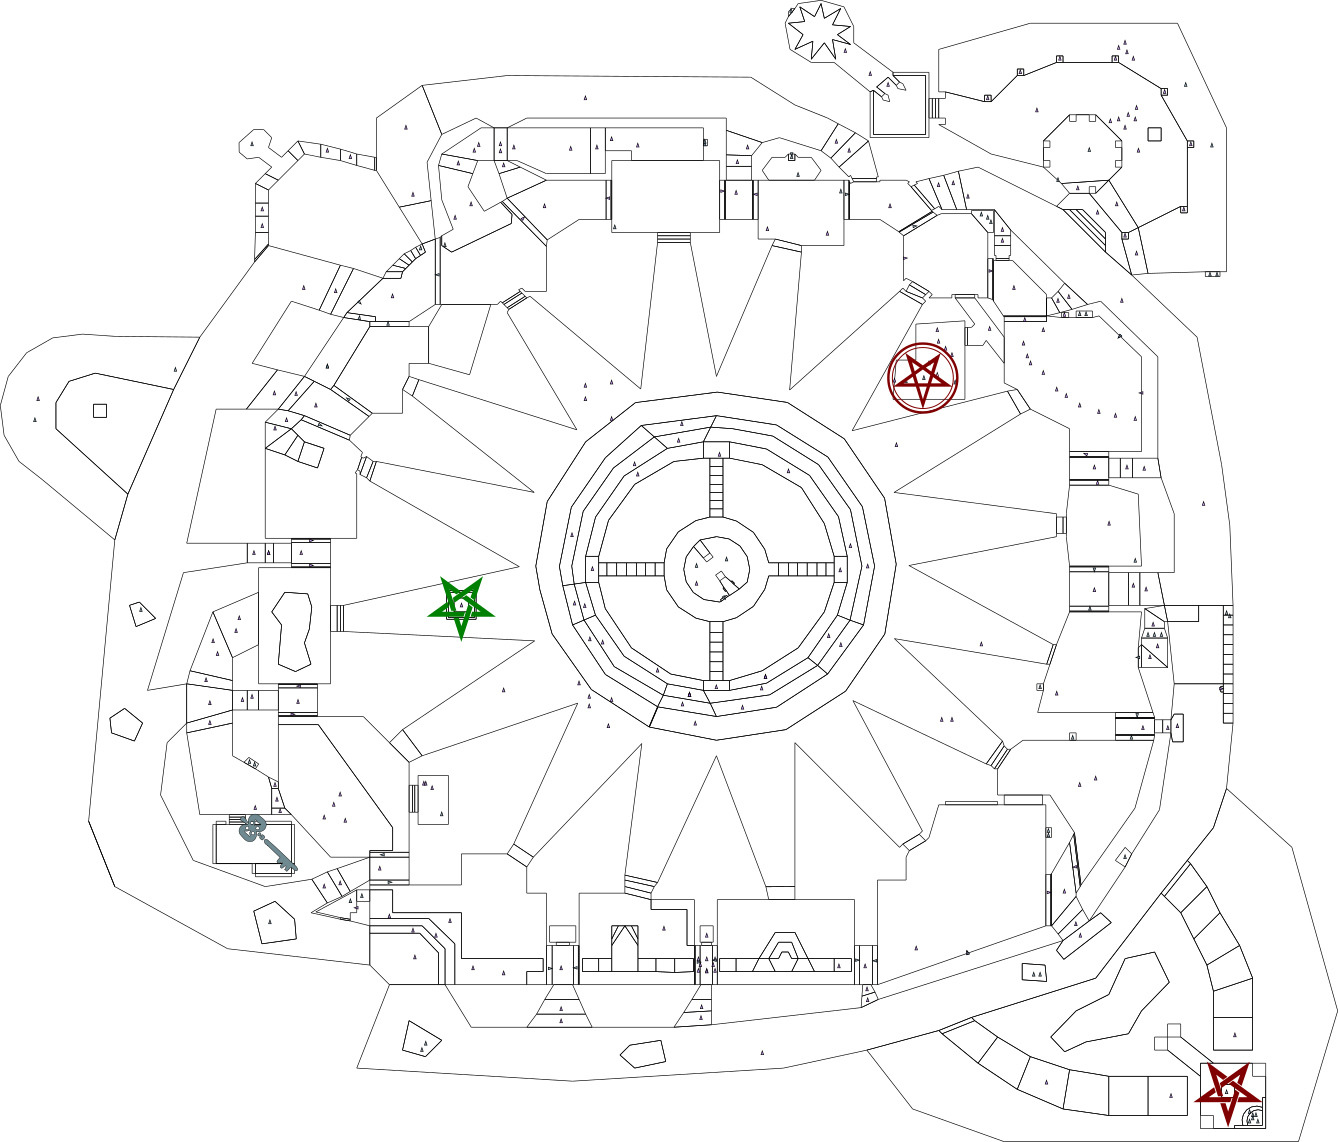
Level 3:
This level is fairly straightforward if you know where to go, but potentially confusing if you don't. For a quick complete that doesn't visit the side areas, first head forward from the start and, in the big room, you can grab your first broad sword from the island in the lava. Now head down either of the brown stairways to the north and you'll see the pentagram around the corner. Collect it and then investigate the wall opposite the biggest set of wooden doors, on the east end between two torches. Although there's not much indication of it, this is a secret passage that will lead you to the exit. Follow the path, killing monsters and being careful of the lava section as you go, until you come to a big room which turns into a maze as you enter it. This is one of several mazes in the game where the automap really helps to cut down on annoyance. Navigate to the small closed chamber located in the maze, being careful of spike pits as you go. Inside the chamber is the exit.
Tips and secrets:
- Stepping on the broad sword's island triggers the doors to small chambers in the sides of the large circular room, where you can find goodies including a bow and a treasure chest.
- In the large circular room right after the start, the doors marked with pentagram designs will open and close when you step on trigger floors near them. The west side area leads to a quiver and Hero Time, the east has a Night Vision scroll and health potion.
- The eastern small wooden door in the pentagram area leads to a little chamber that also contains a Hero Time helmet.
- Following the path through the large wooden doors west of the pentagram will eventually lead you to yet another Hero Time and a passageway opening back into the broad sword room.
- Exploring the maze at the end will net you some potions and a treasure chest.
Notes:
- The maze area at the end of the map contains a few of the rare pink goblins. These, as far as I know, are identical to green goblins in stats. Their inclusion might be an oversight.
Level 4:
From the start, the way to progress is straight forward, but you may want to explore the side chambers for supplies, and also collect the flight scroll you'll see up the stairs near the big door. Once you're ready, head through the big door to find an outdoor area with a lava chasm; the main bridge across is broken but to your left is another bridge made of searing lava which is where you should head first. If you're high enough level (as you should be if you've been killing monsters and haven't died yet), you can use the flight spell to fly safely over the lava, otherwise, you'll probably need a fire resistance potion to walk along the lava bridge. Head through either of the doors into a chamber with a pull chain on one wall. Activate the pull chain to open a chamber with the pentagram and a treacherous spike pit. To get the pentagram, run into and out of the chamber where it is, just making sure that you don't touch the one spike that's sticking up higher than the others. Pentagram in hand, return to the lava chasm.
Your next destination should be a little further down the hallway and to the west, where you find another hallway with a pool of lava in the center and several doors and niches along the sides containing goodies. The northwesternmost niche in this hallway opens to reveal the brass key; it is locked with the black key. Return to the first hallway and head to the door all the way at the end; it is locked with the brass key and guards the exit.
Tips and secrets:
- In the side rooms near the start, when first faced with the three triangles of light on the floor that trigger actions, the leftmost one will permanently seal the treasure room that you see through the grating. The rightmost one lowers the bars to the treasure room entrance and the center one opens a closet containing a Mino Drake.
- The black doors leading off of the pentagram area contain various potions, an Onyx Ring and an Amulet of the Mist.
Notes:
- There is an ivory key in one of the side areas near the start, next to a circular pool of lava. I haven't found a use for it, but speculate it may have been intended for the southeast door in the hallway past the broken bridge. The pull chain in the same area appears to be redundant with the one in the pentagram room (opening the pentagram chamber).
Level 5:
NB: This level suffers from a bug in that prevents one of the areas from being opened normally. I've made an unofficial patch that you may want to apply before playing.
From the start, head straight forward to the north along the bridge until you see the third door on the left, then jump into it to find a tomb of sorts. Pull the chain on the wall and enter the passage that opens to find the pentagram. Now return to the bridge and continue following it north to another pull chain. If you patched the level, pull the chain; if not, you will have to use an Open Doors spell on the grey stone wall beyond it. Either way, when the passage opens, go inside. Upstairs you will find the brass key which will open the door to the exit. You may now wish to explore side areas for more equipment and experience, or go for a quick finish by heading back to the bridge and going directly east to the exit chamber. It is guarded by a Grey Witch who is quite a bit tougher than any monster you've encountered previously.
Tips and Secrets:
- The prison areas directly to the sides of the bridge near the start contain an adamantine ring and a bow. They are also laden with poison arrow traps, which might not actually cause you any damage.
- Exploring the set of prison areas slightly further north will gain you potions and a leather armor.
- On the way to the pentagram chamber, you can find a sapphire ring. In the room across from the one that leads you to the pentagram is another leather armor.
- The northeastern room contains an ornate horn and hero time helmet, but beware of fireball traps.
- The northernmost room is guarded by another grey witch, and contains a strength potion, health potion and two treasure chests.
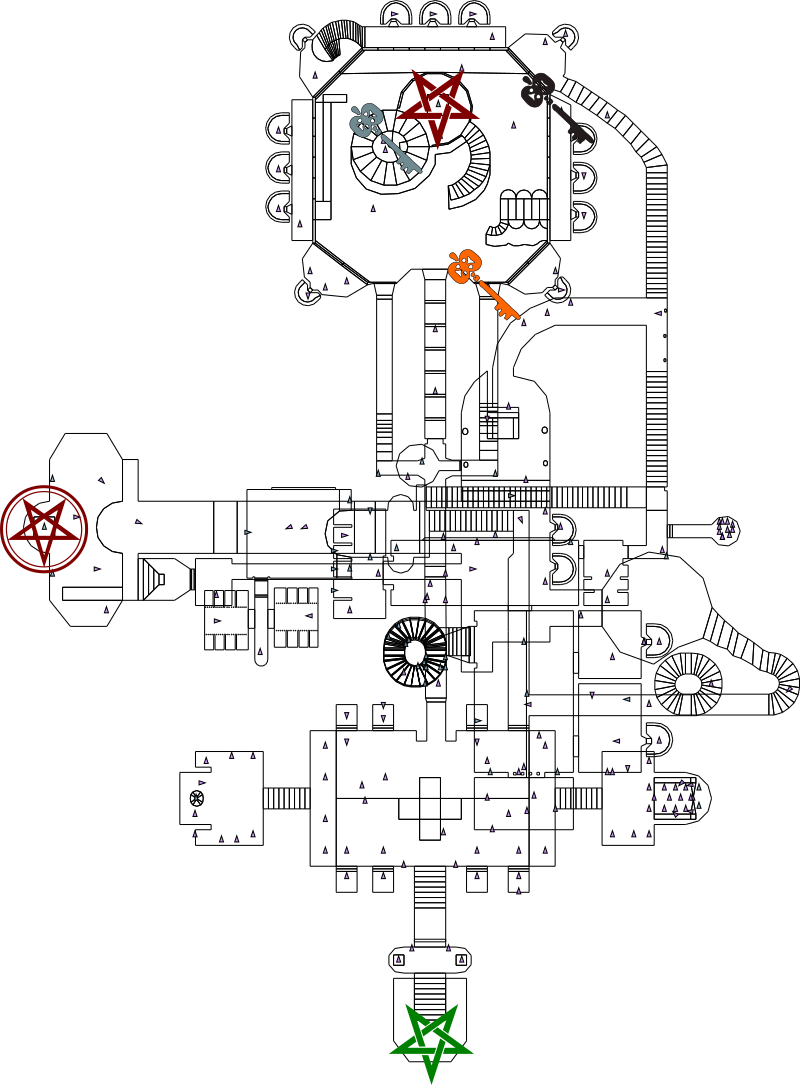
Level 6:
Go forward from the start. It's quickest to go straight but you could also follow the drop-down to the left. You'll reach a room with a skylight and a door to the west which you should head through.
At the branch you come to, south leads to the pentagram, north to the black key.
There is a translucent floor, which is a spike pit. The best way to get past is to crouch and shoot several arrows into the wall over the pit to make a bridge for walking across. You'll come to a large chamber with the pentagram on a pedestal. Taking it will open chambers containing ogres and lava fiends, as well as some items.
Again, using the bow to make a bridge is the best way across. The black key chamber is nearly identical in layout to the one that had the pentagram, though the monster and item assortment is a bit different.
Go back to the room with the skylight and drop down into the south side. Find an illusionary wall that's translucent and head through, down the stairs that lower. You will reach a large room with a fire pit in the middle and many side chambers which open if the dark sections of floor near the fire pit are stepped on. These side chambers are full of green goblins and red ogres, so be ready for a fight.
Through the black key door, you will find a bridge with pits of deadly spikes on either side. On the far end, Illwhyrin will appear for the first time. However, she teleports away when sufficiently injured. The exit pad is across a lava pit, so you might need fire resistance or flight to cross unscathed.
Tips and Secrets:
- A secret area opens behind your start position when you move forward. It contains some monsters, a quiver and a scroll
- If you follow the drop-down immediately in front of the start, you can find a pull chain that will reveal a chamber with some potions. Don't pull the chain behind the potions, it lowers the ceiling which could crush you, and closes off the potion niche.
- If you take the high path directly in front of the start, check the north angled wall; it is a secret door leading to potions, arrows, and both diamond and adamantine rings.
Level 7:
You start out in a room with a goblin and a grey witch. The witch is your priority to deal with. Once you leave the room, your sole available path will take you to the exit chamber, which also serves as the central hub room of the level. Since you don't have the pentagram, you'll have to go hunt it down.
Head through the biggest door, leading to the east, and head to the northeast corner of the square hallway where the dark pad on the floor will raise some stairs. Head upstairs and into the circular chamber at the middle of this section of the map, where the black key resides. Going back downstairs, find the black key door in the tan stone section of this area. The brass key is inside, guarded by a Mino Drake.
Now head to the northeastern section of the map. The pentagram can be found in a room adjoining the northern end of the lava cavern, locked with the brass key door; take it and return to the exit once you've finished exploring any other areas you wished to.
Tips and Secrets:
- The southwest room contains a broad sword. Be careful of the teleporter, it leads to a lava area.
- The lava lake accessible by the aforementioned teleporter (southeast area) has a dropdown where you can find a Nuke scroll and Fly scroll (which you need to get back out).
- The grey structure in the big lava cave contains a Nuke scroll. Stepping on one of the nearby islands opens it.

Level 8:
From the start, go forward into the long hallway and take the first passage on the right; the bars descend when you approach them. There are two side chambers off of this room, the upstairs one contains a brass key. Get it and find the brass key door right on the other side of the main hall. Inside you'll find a Willow Wisp and a Glass Skull. The Willow Wisp can level drain you, so you might want to use your bow for a slow but safe kill. If you do get drained, the Glass Skull gives you a free level up so it's not a huge deal.
Follow the main corridor until you reach the broken bridge, then drop into the water and head west, being careful of the Willow Wisps. You'll find a rock staircase leading up, which will bring you to the ivory key and then to the pentagram area. Once you have the pentagram, drop into the water again and head to the east side. The ominous pit you find in the chamber you'll reach looks like a deathtrap, but it actually teleports you next to the statue in the eastern rooms. From there, it's a brief trip to get back to the main corridor and the exit area in the southwest.
Tips and Secrets:
- The large eastern rooms have two doors to the main corridor. The first one you encounter is trapped with deadly spikes, so use the second one.
- You can fly through the angled windows in the eastern area. One has a Hero Time helmet, the other a bow.
- It's possible to get the pentagram without the ivory key, if you jump up onto the light grey brick platform near the ivory key door.
Level 9:
This level is made up of some tower areas over a lava lake, so have your fire resistance potions ready, and do not be stingy with them if they are needed, as you can find many replacements in the level. Flight spells are also helpful.
From the start, you should be able to jump across to the platform immediately beyond the first door, and ideally stay in the upper regions of the level for the most part. The pull chain on the red wall near the start raises stairs onto the tan spire to the right of it. Atop this rock you will find potions and a treasure chest. You'll also find that the pull chain made stairs rise on the other side of the tan rock as well, leading down to an area of dark grey rock. Take the teleporter here and get the glass key (bypassing the brass key), then teleport back and fly across to the nearby glass key door where the pentagram is stored. Just outside the door to the pentagram room, you'll find a Crystal Staff to recharge your health and armor.
Head back towards the start then, and go up the other set of narrow stairs, to the grey rock spires. Go to the point at the southern end where you can see a low bridge on the lava below, and jump down towards it to head to where you see the plate armor. Take the stairs up into the tan stone structure, and go across the bridge to the door where you see a bow. The exit chamber lies beyond the door, guarded by a Mino Drake.
Tips and Secrets:
- The brass key is optional, but if collected, will allow you to open the door to the room where the glass key is located.
- A diamond ring can be found in the northeast corner.
Level 10:
From the start, drop down and go to the left for the brass key. The right-hand branch has a broad sword if you need one, but it is guarded by lava fiends. Continuing down the main corridor, the next room on the left contains a teleporter that will take you to a spot near the pentagram.
Return towards the main corridor and you are at a spot where there is an upper, lower, and middle path. Follow the middle path to the north. The door on the left is the straightforward path, but the right-hand one contains some treasures in the labyrinth beyond, including a Hero Time helmet, so follow that one. Either way, you will reach a big room of pillars where you will face the game's first dragon boss. Although it looks intimidating, fire resistance renders the dragon harmless, so take a potion and go beat it into the ground.
Tips and Secrets:
- The elevated lava pools in the smithy contain an Onyx Ring and an Amulet of the Mist.
- The throne room east of the dragon's lair contains a Nuke scroll.
Level 11:
For a quick finish, head directly down the corridor and through the door at the end to battle the game's first Skeletal Witch for control of the pentagram. Fire resistance will not protect you from her spells, so have healing ready. Once you have the pentagram, activate a flight spell and go up through the high holes in the wall to the west, where you'll find the exit.
You do, however, probably wish to explore the side areas before going for the pentagram, since there are some quality items in this section of the dungeon, including a free level up in the form of one of the rare Glass Skulls.
Tips and Secrets:
- The northwesternmost side area contains a Glass Skull, and a hidden treasure room behind the waterfall.
Level 12:
Be careful of the pool in front of the start! There is a spike pit of death in the middle of it. First, go and collect the brass key. A quick way is to take the right-hand path and go through the teleport you'll soon encounter, taking you to the brass key room. Once you've got the key, go back to the teleport room, but this time continue past to find the pentagram area.
The pentagram is blocked off behind four square walls, and guarded by a Skeletal Witch. The black wall ornament over the water section of this room is an illusionary wall, behind which can be found the pull chain for making the pentagram accessible.
Now head into the office-like area to the southeast. A bookshelf here is a secret door, and behind it, following the stairs, you'll find a grey ornamental structure that is the brass door. You'll find an area full of skeletons, and the black key, which you can bring back to the black key door. Directly beyond the door are a Mino Drake and the exit.
Tips and Secrets:
- One of the white stone ornamental panels on the return path from the brass key is a hidden door.
- The second shield in the skeleton area past the brass key door is a death trap.
- The hidden Hero Time helmet in the dark area behind the "office" desk is also trapped with lethal spikes. Flight is the only safe way to collect it.
- However, if you hang to the furthest right side of the spot under the desk when you move forward, you will instead drop into another hidden chamber that contains a second, safe to collect Hero Time.
Level 13:
One of the more annoying levels in the game, in my opinion, as large sections of it are nondescript maze set with spike traps, so don't be ashamed to use the automap. First, head for the pentagram area. Use the pull chain on the outer rim of the area before you drop in after the pentagram, to make sure you don't get stuck down there.
From there, you can head to the east side to find the exit inside the maze. The keys are optional.
Tips and Secrets:
- Immediately to the left of the starting area, you'll find a chamber containing an Ankh and an Onyx Ring.
- The big chapel of gore in the center north contains a broad sword.
Level 14:
In this level, each of the four main doors leads to a room with a pull chain that opens one of the four secondary doors. When choosing your initial path, pick the stairway that has three ogres (east). This will lead you to an angled room whose pull chain opens the way to the magic sword, which is a massive upgrade to your arsenal and will be a great help in battling the many Skeletal Witches in this level.
Next, you will need a black key. There are two options, I recommend that you do not enter the lava area yet, so go for the other one. You can open it with the chain in the room that has plate armor and a bow on platforms (south). With the black key, you can open the pentragram room in the tan stone area; pick up the ivory key right down the hall as well, as you'll need it for the exit door, which is in the lava zone.

Level 15:
From the start, there's only one way you can go until you reach the water pool room. Take the path to the left, and when you reach the round lava pool, take a moment to look above it—there's a Fire Walk Scepter floating in the air over it. If you can use a fly spell, go ahead and grab it, then head around to the northwest section of the map, collecting the brass key on the way. The black key is not strictly necessary, but makes the level more convenient to complete, so get it as well by jumping across the stone pillars, or flying there.
If you didn't get the Fire Walk Scepter, use a fire resistance potion, and go down into the big lava lake near where you got the keys. The pull chain on the north wall will make the pentagram accessible; grab it and head to the teleport on one of the stone islands in the lava.
Now you can head through the black key door to the south. The brass key door on the east side of the "four arrows" room leads to the exit.
Level 16:
At the start of the level, you will have to pull the chain to raise the platform you're on and get out. The two side chambers have some handy supplies, as well as monsters, while the wooden door is the way forward to the rest of the level.
Once you drop down, pull the chain to open the bars, and grab the black key as you go through. Continue heading north to the exit room, going to where the quiver is to trigger a passage opening, then go through it and seek out the black key door. Open the door to find the brass key, as well as a teleporter behind an illusionary wall, which you must go through.
Head down the corridor to a room with a white brick structure submerged in the water. Pulling the chain raises this into stairs. Head up and through to the overlook above the big muddy water room. Don't fall down, or you'll have to do a lot of backtracking. The way to the pentagram is on the south side, protected by a couple of doors. The first is opened by stepping on one of the brightly-lit corners of the room. The second is locked with the brass key.
The pentagram is in a nondescript-looking room, but beware! There are hidden spike traps all around it. Flight is the safest way to collect this one. Once you have it, backtrack to the exit chamber.

Level 17:
This is one of those levels where a lot of the map area is optional. The first vital item is the pentagram, which can be found to the northeast; from the start, turn around, head towards and past the central structure and bear to one of the spots between the four central spokes. A little corridor joining those two rooms contains the door to the pentagram chamber. The Fire Walk Scepter is also hidden nearby, and is quite useful here; if you want to collect it, check the tips and secrets note.
Now, you can explore if you wish, or drop down into the outer ring of lava and head south to the exit. If you didn't get the scepter, fire resistance potions will be vital, but the level contains a good stock of them.
Tips and Secrets:
- The rare Fire Walk Scepter is hidden quite well on this level; to find it, go to the room just east of where the pentagram is, where there are a bunch of barrels in a row. Find the seemingly empty notch in the wall next to where a health potion and fire resistance potion are. Stand in the notch, activate a flight spell and fly up to grab the scepter.
- The central structure in the level has arrows and a halberd. Each rising platform works only once, so don't waste them.
- There are two Sapphire Rings. One is in one of the northerly water chambers, another is in a room off the side of the area where there are a bunch of little demon skulls in translucent boxes, at the northeast of the map.
- The magic sword near the exit is trapped with spikes. Use flight to collect it if you need one.
- Where you find a half-built stairway in the lava zone, you can jump up and hit a pull chain to raise the stairway further. Jumping the gap in it may be difficult, but the arrow ladder trick works.
Level 18:
From the start, head to the square central structure and up the stairs to the corner entrance, where Illwhyrin makes another appearance. The arrow-ladder trick can help you get in here, then you can battle your way to the brass key. The brass key door is to the east of this structure, and through it, the black key can be found in the first chamber on the left.
Go to the southeast of the big square, where a section of floor lowers, and descend into the area that's revealed. You will want to head to the water area where there are many pillars, and locate the pentagram before returning. You will have to fly to get back out; a few scrolls can be found in this region.
Once you have the pentagram, head to the southwest area where the black key door is. The exit is just beyond the door, guarded by a couple of Mino Drakes.
Tips and Secrets:
- Towards the back of the area that's locked with the brass key, you can use the pull chains to raise stairs to the far back of the area. Another pull chain there will open the middle structure, which contains a morning star and sapphire ring. Be careful, however, as it is possible to become trapped in the back area.

Level 19:
Head down the corridor you begin in until you reach a drop down, which you should take and turn right to reach a larger water room with a maze-ish central wall. Walk across the central wall to the door on the far end and head through the passage; a pentagram-marked door will open to your left, which you should investigate. Be very careful of spike traps here; either use the arrow bridge trick, or a flight spell. You will find the pentagram at the end of the passage, and taking it triggers a wall to close. Run back as soon as you've got the pentagram—if the passage closes all the way behind you, you're screwed and will have to reload/restart the level. Once you've got the pentagram, you can explore for treasure, or head back to the exit.
Tips and Secrets:
- At the very end of the initial hallway, on the other side of the dropdown, is a door. There is a concealed spike pit immediately in front of this door, but if you fly across, you can find a few goodies including a Nuke scroll.
- A magic sword can be found near the start, in the craggy area to the right.
- A locked door which can only be opened by Open Doors due to lack of the matching key can be found in the maze-wall water area. It contains both types of amulets, a magic arrow spell and a quiver of arrows.
- Also in the maze-wall area, opening a secret door on top of the white rocky platform will lead you to an area with evil eye patterns on the walls. A rising staircase leads to another quiver of arrows.
- From the start, go left and then left again to find an area with a mutilated torso and a Mino Drake. Illusionary walls here conceal a bow, chainmail, quiver of arrows, treasure chests, Adamantine Ring and a (useless) brass key.

Level 20:
You start out near the center of the level.
You will want to head to the the cross-motif area in the northwest where you can collect the brass key. The hidden teleport to the north of the start is the quickest way to and from here. Now return to the start area with the key.
The more northerly lozenge-shaped wall near the start contains the pentagram; the entire wall is actually a brass key door. From there, go down the nearest curved stair and through an illusionary wall to the exit chamber.
Tips and Secrets:
- In the lava area, getting onto the island where a lava fiend guards treasure will open a chamber containing a dragon and an ankh.

Level 21:
A small and straightforward level. Head into the mausoleum directly in front of you, heading to its central area and then crouching down the tunnel at the end of the corridor of bearded mascarons. Take the teleport and follow the stairs to where you can find the glass key. The glass key door, though which you will find the pentagram, is on the east side, and the exit pad is just a room over.
Tips and Secrets:
- One of the gravestones near the start has a teleport behind it, leading to a chamber with some minor treasure.
Notes:
- For better arrangement of page space, I've moved the diagram of the detached teleport area closer to the rest of the map for this reference than it appears in the actual map data coordinates.
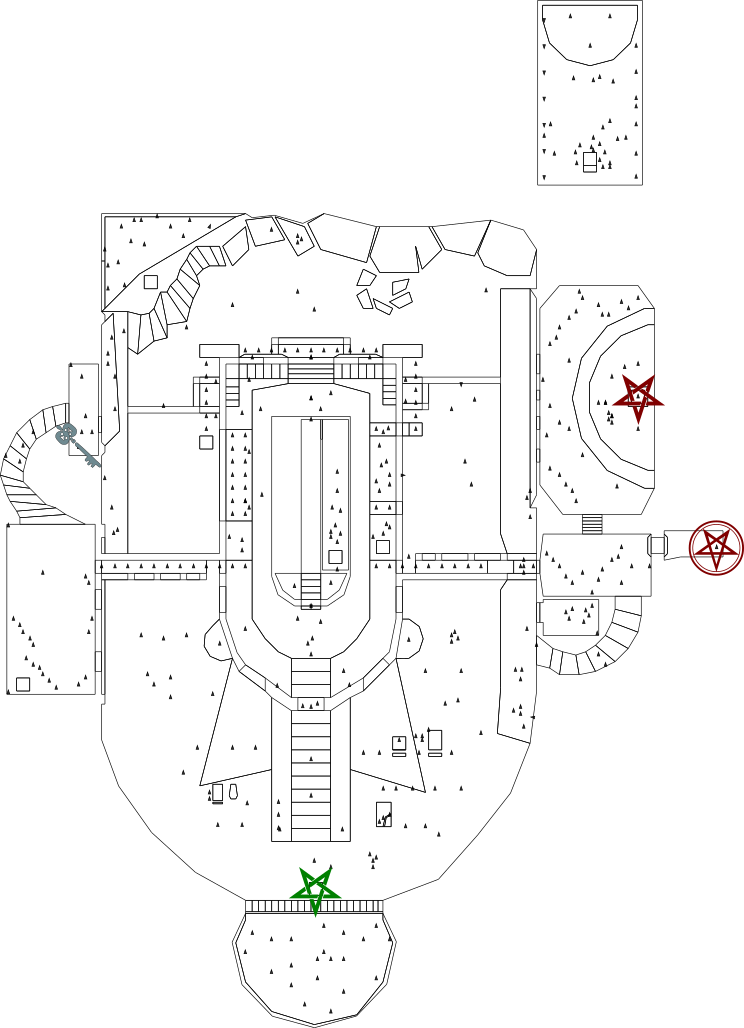
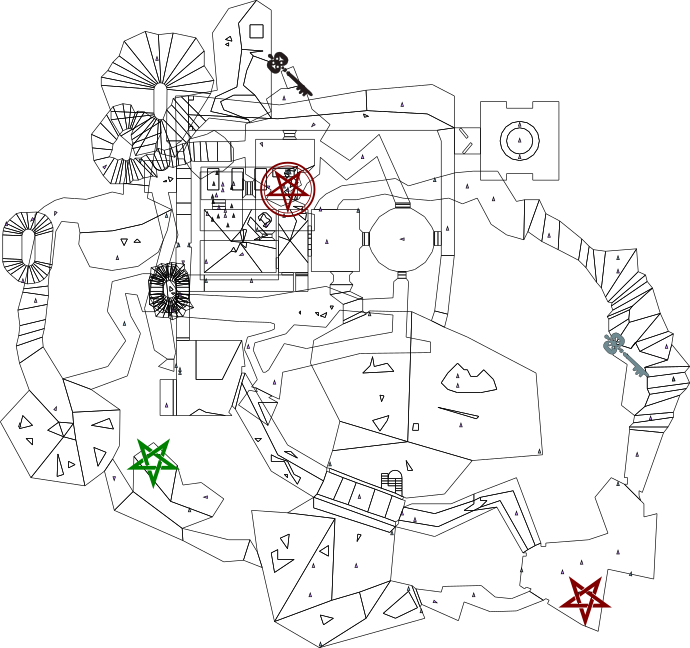
Level 22:
From the start, go through the door, turn right and drop down, then jump up the small elevation and follow the curved brown hallway. When you get to the spot where arrow traps fire from the walls and a Skeletal Witch attacks, you will find a translucent illusionary wall to your left, where you will find the pentagram. Continue following this corridor, and when you reach the dropoff, take it, jumping up onto the grass and then the continuation of the brown stones to keep following their path. Head up the curved stairway to your right and open the door that you see across the way at the top to find the black key.
Head back downstairs and go across the uneven tan rocks in the middle outdoor area, finding yourself back at the start. Head up the short flight of steps and to the right, cross the bridge you come to, and turn right. The door to the exit (black key lock) is at the end of this hall, with another Skeletal Witch guarding the exit pad.
Tips and Secrets:
- If you turn around from the start position, you'll find a glass skull right nearby.
Level 23:
For a quick complete, if you are able to use fly spells, drop into the water and head east. Fly up to the platform where you see a squared tan stone structure, and head down the passage to the south. Pull the chain to open the first part of the giant portcullis guarding the exit. Go back in the water, head west and take the teleport you find to go to a small fort in the middle of the map. Upstairs in the fort, you will find the second pull chain. Now, drop into the moat and take the teleport there to reach a room with several "cupboards" containing potions. From the potion room, head through an illusionary wall up the stairs to find the pentagram. Teleport back to the moat and head through the now open passageway to the exit.
Tips and Secrets:
- There's a magic sword in the fort.
- There's a Hero Time helmet in the southwest, reachable by crossing the lava pool.
- There are several useful items in the otherwise optional western jagged-patterned room, some reachable by flying.

Level 24:
From the start, head left, and you will soon find a side passage away from the central tower. Follow it to find a raised grey stone platform. Immmediately turn left, then left again and up the stairs. To your right, you'll find a small passage in the corner where there are white stones with vines on them, which can be revealed by a nearby floor pad. Follow it. You will find a garden sort of area with many square pillars. Head to the end of this area where you will find a wall that lowers, and in this area you will discover the black key guarded by a dragon.
For the pentagram, return to the dark grey stone platform and head to the other side of it, near the big face on the wall, to find a smaller platform with a teleport. Warp through and go through the doors, following stairs up, then down. The pentagram is nestled in the crook of the downward stairs.
Now follow the nearby teleport back to the central area, and approach the wall of dark grey stone to lower it, revealing a lava area. Cross and find a trap-laden room on the other side. Through the black key door you will find the exit chamber, with lots of supplies to refresh you for the final battle.
Tips and Secrets:
- In the area just before the black key door, there's a row of items floating in the air. Get them right away as there's a trap pad that will block them off if you're not careful. They can be reached by flying.

Level 25:
This is the final level, and it's a fairly short one, but with lots of tough monsters. Head northwards and then through one of the side doors adjoining the bridges, leading into the big pillar laden area. Lots of big enemies are here, including Illwhyrin who you should focus your attacks on. She is not messing around this time, so use all your potions and powerups, and when you kill her, she will drop the final pentagram. Grab it and take it to the big door at the far north, through which you'll find a pad with a horned skull. Bring the pentagram here to exit.
You have won the game.

Witchaven II walkthrough
Level 1: Halls of Ragnoth
You can tackle this level via a few different routes, but your first major goals are getting the pentagram from the chapel at the southeast part of the map, and the brass key from the southwestern part of the main building.
For the key: head forward through the big skull's nose and into the main chamber. (If you opted to go for the pentagram first, get back into the building via the stained glass windows.) Step on the floor pad in the center to open the doors. Head west, then south, and follow the hallway that circles around until you reach the stairs to a smaller room. To open the door, step on one of the sloped floors that has a dragon statue sitting on it (either one should work). The key is inside.
For the pentagram: head to the east of the level, either fire resisting your way across the lava, flying over it, or smashing through the windows of the large building. The chapel is to the south, and inside you'll find a Guardian and some Ciraean Sentinels at worship. These are spellcaster Sentinels, and with their backs turned haven't noticed you until you approach or attack, so if you have the spell, you might want to just make like Duke and nuke 'em. There are also some skeletons further in, but they should pose little threat. Once the coast is clear, jump on the altar to open a hidden section of wall with the pentagram behind it.
Once you have both the key and the pentagram, head back to the large three-way room north of the skull entrance and go north up the stairs to the locked door.
Past the brass key door, don't miss the ankh, then head to the west, pulling the chain to open the western door of the water pool room. Up the stairs, go south and pull the chain to find the black key in one of the niches that opens. The switch that's in one of the niches will open the way back to the pool room, but close off the niches, so collect what you can before you pull it. Key in hand, backtrack to the water pool and head through the black key door to find yourself in the final room. Fight your way over to the pentagram pad and journey onward.
Tips and secrets:
- Beware of the room that contains the shield. You will see that the floor in the doorway is a bit lighter in color. Don't step there, or you'll fall through onto a spike.
- You can get over the uneven rock by the chapel to get behind the building. There are some potions and scrolls as well as an onyx ring back there.
- In the armory where you find weapons that can be taken from the wall, walk under the skylights to open a couple of secret chambers. One contains a weapon enchant shrine, the other, some potions and treasure. There is a spike trap under the doorway to the treasure room, so beware.
- In the dark hall along the eastern side of the main building, break the stained glass on the west wall to find some hidden scrolls.
- If you go to the island at the southwest side of the lava lake by the start, you can find a hidden door in the wall.
- There's also a hidden door on the west wall at the far northern extremity of the eastern outdoor area, where some ogres are. It contains a Nuke scroll.
- Before you leave, check the northeast corner of the final room to find a secret door with a small hoard of silver behind it.
- The final chamber also has some goodies placed on the central structure, so jump up and take a look there too.
- Be alert for scrolls placed high up near the ceiling. You can reach them by flying (and in some cases jumping).

Level 2: Loki's Tomb (or Lokis Tomb)
Collect the useful resources near the start and head southwest, being wary of the lava pool and the willow wisps in that direction. As you head southwestwards, you will also notice the exit pad, but you'll have to locate the pentagram before you can get out of here. You will find two rooms with weapon enchant shrines. Whichever one you go to will lead you to the same place; so break one of the stained glass windows that hides a pull chain. The chain will open a door into another corridor.
Keep heading southwest, but be wary of the light spots on the floor of the hallway: they are trap triggers that will fire poison darts (although in vanilla Witchaven II, the darts will probably fly harmlessly over your head.) Continuing southwest, you will come to an area protected by a Guardian. Defeat him and continue in the same direction.
In the area downstairs, you'll find the brass key, as well as a good supply of health potions and a halberd. Grab what you want and backtrack to the northeast. The brass door is along the hallway you came in through. Head into the room and break the windows to find the mechanisms that will reveal the black key. There's also an ankh in this area so go ahead and heal up.
Head a short way back to the junction near where you killed the Guardian, and take the eastward-leading hallway that you hadn't explored yet. This will lead you to the black key door behind which is the pentagram. Now you can head back to the exit.
Tips and secrets:
- Right near the start, there's a square wall with stained glass windows on every side. Break the windows to find a bunch of goodies, including a Hero Time helmet.
- There's a Nuke scroll floating over the exit pad. Use flight to get it, and make sure you pick it up before you get the pentagram, or you'll end up leaving the level without it.
- Several side chambers with useful items are hidden behind the stained glass windows in the southwest near where the Guardian is located. But beware, as one of them leads to a pit of death.
Level 3: Forsaken Realm
From the initial swamp, there's only one path to take for a little bit, though you might want to grab any needed supplies that can be found along the sides of the area.
When you come out to the tan stone area, don't miss the brass key room immediately through the door to the north; it's guarded by Lava Fiends and their accompanying lava.
Now head south and through the first closed eastward door you see. You'll find a sort of peninsula of rock surrounded by more lava, with a passage in the wall across the moat at the far end. You can try jumping across, but flying is safest. The dark area looks quite ominous, but if you use a Night Vision spell (or trust to luck) you'll find that it's just a small space containing the black key.
Go back to the main canyon and keep heading south until you reach a cave with a low path (black key door) and a high one (brass key door). Explore both, the low path has the glass key while the high one leads to the pentagram area. Now head back north along the tan canyon until you come to a door a little ways past where you got the brass key. You'll know it's the right place if you see a small dark area with hanging skeletons. Head through here to find the exit room.Tips and secrets:
- The lava moat in the black key area has some scrolls hidden in it that can be collected with fire resistance or flight.
- The west loop from the canyon, while not on the completion path, contains some nice items such as a two-handed sword, an ankh, and plate armor.
- The western circle-and-cross shaped room contains some scrolls and weapons. Don't trust that Nuke scroll though... there's a spike under the discolored floor patch.
- If you brave the spike trench and lava in the ominous-looking cavern through the door near the brass and black key door area, you can find some more scrolls, including an Open Doors spell.
Level 4: Eye of Midian
From the start you can see into the ending area, but you won't be able to get there right away. Head west first and go into the circular structure via the door to get the brass key. Then head north to find the pentagram, pulling the chains in the big cross room to open its chamber. The pad it's sitting on will close off the way back, but don't panic; stepping on this floor plate again will open the way back up.
From there, head back to the start, go east and pull the chain to open the room with three reflecting pools and a bunch of imps. Pull the chain in this room to open some passages. Take the northwestern passage that opens, near the end of which you'll find a swinging door that requires the brass key. Carefully open the door to enter the final area. There's a big welcoming party that you might wish to freeze or nuke.
Tips and secrets:
- The stained glass maze and the northeast section of the map are optional, but contain some nice treasures. The northeasternmost point, in particular, contains an ornate horn, while the maze has an armory with several weapons.
- The room east of the start with the imps and reflective water contains two pull chains. Beware that pulling the second one will close off the passages opened by the first, locking you out if you don't have an Open Doors scroll. This can make the map unwinnable!
- Be careful of the indented floor containing a Shadow Amulet in the stained glass maze. It's a trap with death spikes underneath.
Notes:
- I haven't found a purpose for the black key in this level.

Level 5: Dungeon of Disembowlment
You start this level inside a centrally located tower. When you exit the tower, head up the spiral stairs and you will find yourself with several paths to choose from.
Although it's optional, the Fire Walk Scepter will come in handy on this level. From the starting area, it's up a short flight of stairs to the southwest, past the statue room in an area with a grid pattern of lava pools. You'll have to fly to reach it; a scroll is in the same room. Head to the southeast passage. If you got the Fire Walk Scepter, you may want to follow this trail to its end and venture out into the lava lake full of Lava Fiends and Willow Wisps so that you can get them out of your way. Then go to the pull chain that sends you up a lift. Don't back off the lift or you might miss your chance! If the lift is blocked off for any reason, you'll have to fly up from the lava lake area, or use an Open Doors spell on the black key door. At the top, you'll be in an area with grey patterned walls. This leads you to a bridge high above the lava lake, beyond which you can find a sort of fire shrine containing the black key. The lift you took up doesn't re-trigger, so find another way down, perhaps by following the ledge above the edge of the lava lake to where it drops off into a safe area—you'll find a nice collection of potions and scrolls, as well as a Hero Time helmet there.
Head back to the start room and this time go to the northwest passage from it, with the wooden structures that have red pyramid caps, which leads to the black key door. The pentagram is through there, but it's guarded by an evil wall-shooter trap. You might want to just fire resist through it. Don't pull that chain that taunts you, either; it seems like it's meant to shut off the trap, but actually glitches it so that it kills you even worse. Now you can head back to the southeast passage, this time pulling the chain that opens the first branching area. The exit pad is right there.
Tips and secrets:
- In the Fire Walk Scepter's room, you can break the stained glass to find some goodies; there are some more in side chambers of the doorway as well.
- The wide brick-lined passage northeast from the start area contains a weapon enchant shrine.
- In the other side room from the branch where you get the pentagram, there's a Nuke scroll. Surprisingly enough, there's no trap this time.
- Is that Lava Fiend on the ledge above the starting area just there to annoy you? He's actually guarding a brass key, so fly up there and get it.
- The brass door is down a long grey corridor north from the starting area. The entrance to the passage is next to the lava fiend's ledge. Beware of the spike in the doorway... it may be raised but it can still kill you. Through the door is an optional area with a good stock of goodies, including the coveted glass skull.
- On the way to the brass door, there's a ledge with a couple powerful scrolls across a pit of spikes. Fly to get these.
- If you go beyond the exit room, through the pull chain door, you can get a Hero Time Helmet and a two-handed sword as well as a bunch of spells.
Notes:
- As far as I know, this map contains the only Glass Skull and the only Fire Walk Scepter in all of Witchaven II.
- The in-game map title is presumably intended to be "Dungeon of Disembowelment", but says "disembowlment" with a missing E.
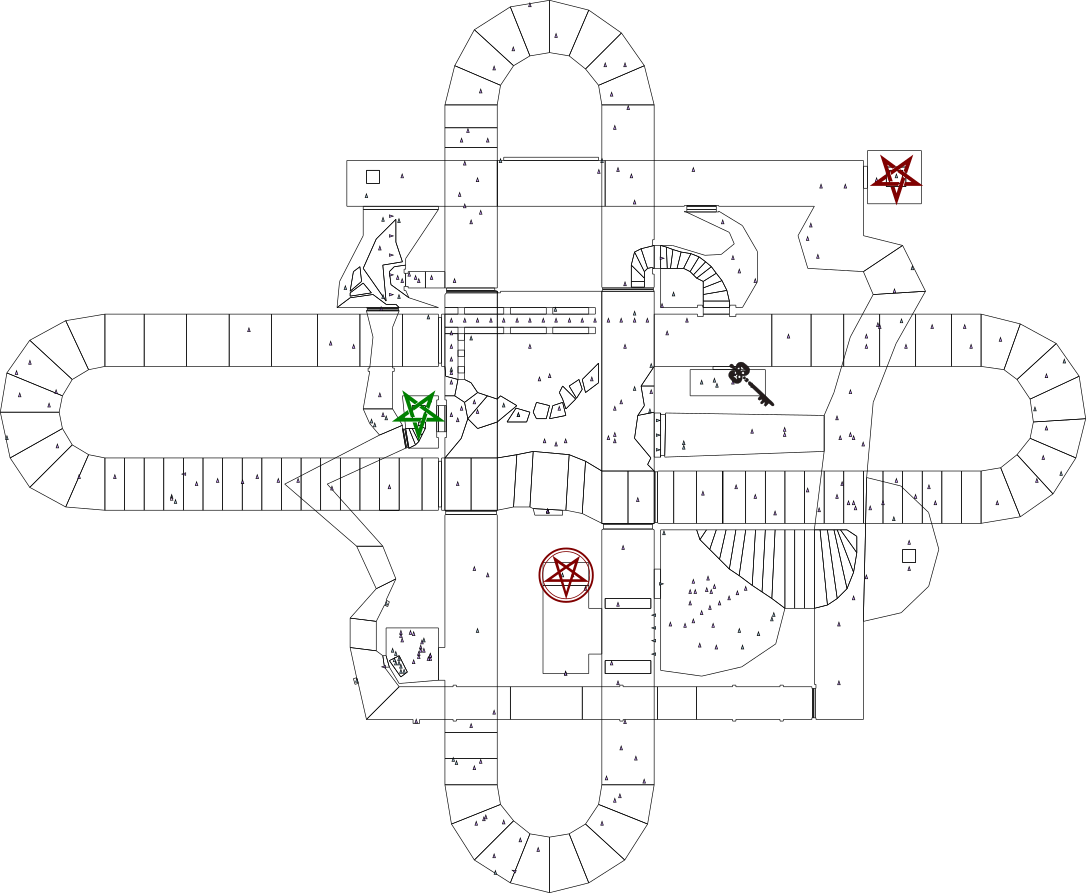
Level 6: Stronghold of Chaos
Right at the beginning, you're stranded on a platform in the middle of a lava pool. Use your fire resistance potion if you have one; if you don't you'll have to suffer some pain as you hurry out of this room. There are no goodies in this starting chamber either, so don't waste your time searching it.
Now there are a few places you could go. The pathway to the pentagram isn't locked, but the exit door is, and they key to there is locked in as well, so first head to the eastern roadway of the fortress. On the north wall is a big wooden door; pull the chain by it to open it. Through the room full of imps is a door to a smaller room containing the brass key.
Now that you have the key, head to the northwest section of the castle and collect both the pentagram on the altar-like structure, and also the black key that's just upstairs from it through the brass key door. Head back to the center and from there into the southwest part of the castle, upstairs and through one of the black key doors. Pull the chain to lower that huge, ominous-looking door, behind which you find nothing but a couple of Mino Drakes and the exit pad.
Tips and secrets:
- When you exit the first room, crawl into the passage in the outer wall to find some goodies, including an ankh, plate armor and some spells.
- The narrow passage on the outer western wall of the map can be reached by flying. You will find a hoard of gold at the end of it.
- In the northeastern quadrant of the castle is some sort of satanic shrine. Find an ankh amongst the goblets on the table. Although it might appear that there's a connection between this area and the brass key room, there's no mechanism to make it open. The red "door" is also a fake.
Level 7: Jaws of Venom
This level may be rather confusing to navigate as the two central large chambers and the corridors attached to them look quite similar. The chamber you start in has some water spilling from the central column, its twin doesn't. Check the automap if you start feeling lost.
Go ahead and collect the brass key first; from the starting chamber, take the more northerly of the western doors and head down the hall to the room where you'll find it.
From there, you can head over to the eastern side of the map and enter the pentagram chamber. When the coast is clear, head up the spiral stairs and claim your prize. Don't panic if you get locked in and the pull chain has been used up, just climb the stairs again and the door should re-trigger. Now, if you didn't carry over a flight spell from a previous level, head back to the northern water chamber and pull the chain by the northern doors to open them. Get the spell, you'll need it.
Explore the area if you wish, then make your way back south to the lava chasm in the south-central area. The black key is hidden down there, but the pit is too deep to get out of, so fly or die.
Now that you've got the pentagram and the black key, you can head to the exit chamber at the west end of the map. Bash the Midian Warriors who are waiting for you and get out of here.
Tips and secrets:
- The small passage to the extreme north, near the large swinging doors, drops down to a hoard of silver, but beware that you may need a flight spell to get back out.
- Once the stained glass windows are broken, you can jump through them to quickly get to the adjacent rooms.
- In the hallways to the east and west of the water chambers, jump up and explore the areas with the red barbarian face walls. Not only do they contain treasure, some of them connect the hallways to each other.
- Between the two big sets of swinging wooden doors in the west, you can find an Open Doors spell and a bunch of gold.
- Don't miss the weapon enchantment shrine in the southwest region of the map.

Level 8: Descent into Doom
A map title with the names of two popular 3D games in it? Mmm-hmm. Anyways, The design of this level is like a big pie with wedges that you can get to through the central area. You start in one of the southern wedges. Collect the Fly scroll that's behind your starting position (you'll need it if you didn't carry one over). You might also want to collect the fire spells, Hero Time and halberd down in the lava room; there's a pull chain that will open the way out of there but you do have to step on lava to hit it. The other side of the wedge contains more items, including plate armor, another Fly spell, and an ankh. Once you're stocked up, head down the hall to reach the central hub.
You can find the glass key in the wedge that's next door to your right, a southeast wedge of the map. There's a dark pit with spikes in the bottom; fly over it to get the glass key.
Get the black key too, it's on the other side of the starting wedge, that is, the southwest section. You'll find a long hall that drops down into large rooms to either side. Go to the end and then drop down to the right to locate the key.
The pentagram is in the eastern section. Take a look at the wall to your left as you come into that corridor and jump up into the higher room where you'll find an overlook into the pentagram chamber and a floor plate that will open one of its doors. The other door is locked with the glass key. The black key will get you into a suspiciously barren-looking northeastern slice (the door is to the right of the wooden rose design in the central chamber). You see a dragon brazier at the end of an empty hall, no goodies, no enemies. This place is indeed suspicious. Go to the end by the brazier, activate a fly spell and head up into a larger area guarded by various barbarians. On one of the forks hugging the hall you flew up from, there's a floor plate that will open a throne room where you find a Guardian, a Hero Time Helmet, and the brass key.
Now that you've got the brass key and the pentagram, go to the northwest section, which leads to the exit. Along the way, there's a reflecting pool with a red platform to your left. Go there to find the pull chain that opens the barrier between you and the exit zone. The door to the exit is to your left past the bars and locked with the brass key.
Tips and secrets:
- The right half of the western section includes a set of platforms above your head. It looks interesting, but it's a trick: there is nothing valuable up on those, so don't waste a precious fly spell investigating.
- When you get near the exit, instead of leaving right away, follow the lava river to the right. There are goodies including a diamond ring up the stairs at the end of it.
Level 9: Hack n Sniff
This level wants to beat the heck out of you right from the start. Bash the barbarians who were waiting for you and head through the door and down into another room where a Mino Drake is lurking amongst some barrels. The door right ahead of you is locked with the black key, you'll find it in the southern one of the side chambers off of this room; the other side chamber contains a treasure hoard.
Through the door and up the ramp, continue to fight your way through the guards. You find yourself in a four-way lava chamber. Fire resistance is helpful here to deal with the Fiends and get to the central control post which has pull chains to open the doors. The chain immediately in front of you will close off the way back, but go ahead and pull the other three. One path is further locked with a brass key, so you'll have to pick one of the others.
The way to complete the level lies to the east, so unless you want the side stuff, go there now. Head to the end of the stained glass hallway, being wary of ambushes as you go. Turn right, then right again. The brass key is in the central pillar of this small room, but hurry to grab it before it gets closed in! Once you have the key, you might also want to visit the armory in this area for some nice items.
Backtrack to where you turned off from the stained glass hallway, and follow the other branch. The eastern fork has a floor plate that will open the doors to the exit area (you'll hear them creak). You might want to save before you do this as sometimes it glitches and kills you. Now that you've got the brass key, head back to the four-way lava room and through the brass key door to find the pentagram. To safely collect it, you'll have to use a fire resistance potion. The arrows aren't "fire" but the potion will protect you none the less. Take the pentagram back to the stained glass hall and through the door on your left to return it to its place and escape.
Tips and secrets:
- The west area from the four-way lava room contains a Hero Time, but not much else aside from enemies and opportunities for death. Beware of spike pits behind the windows if you break them.
- The northwesternmost room is an armory of sorts. Pull the right-hand switch to open up side chambers with even more goodies, including Hero Time and an Ornate Horn.
- In the northern area where the floor pad is, fly across the lava to find some potions and a seemingly useless glass key. Don't try to cross this gap by jumping unless you feel like dying a horrible death; if you've only got one fly spell make your trip a quick one.

Level 10: Straits of Perdition
Once again, you start off under attack. Fight your way through and head north, being wary of the lava cracks. Where the northern wall nips in, you'll find a pull chain that opens the tower where the brass key is. Jump to safely get the key, or use fire resistance if you've got enough to spare. Once you've got it, head west through the brass key door.
Pull the chain in the next room to open a big outdoor area, and continue through into a large chamber full of barrels. To the north and south are side areas, and the north one, if you visit it, is a trap from this approach, so go upstairs through the door to the west.
Through the eleven o'clock door from the pentagram room, open the secret door at the end of the short passage. You'll find a sort of big lava arena beyond. Pull the chain down there to make the pentagram accessible.
The room you find beyond the eight o'clock door will lead you to the glass key; once you've got it, the seven o'clock door can be opened. Don't be fooled by the simplicity of this room with the floor plate; explore the edge of the structure to find a ramp down to the black key.
Through the one o'clock door you'll find a rather oddball mechanism: a floor pad that requires the black key you just got. Trigger it and a great creaking will indicate the opening of the doors that barred the end of the ten o'clock passage; pass this way to return the pentagram to its place and continue your quest.
Tips and secrets:
- Go to the end of the hallway that runs south of the big outdoor area and break through the stained glass to find a weapon enchantment well.
- To the south of the aforementioned hallway is a treasure room, also hidden by stained glass.
- Through the five o'clock door from the pentagram room, find an Onyx Ring and a Fly spell (which you need to get back out of the lava pit there.)
- In the big lava arena where you pulled the chain for the pentagram, fly north to the potions on the ledges. From there, you can fly down into a treasure room with gold and an ankh further north (this is the area that would trap you in if you went there via the hall from the barrel room).

Level 11: Plateau of Insanity
This level has lava galore and you're going to have a rough time if you have to start fresh on it. Flight and fire resistance are quite useful for traversing the volcanic landscape.
You start off in a large cavern-like area in the northwest of the map. Grab some useful supplies as you fight off the Lava Fiends and Willow Wisps: some health potions north of your start position, and a Fly scroll in the extreme northwest of the map, reachable by following a narrow path along the outer edge of a lava pool.
Continuing to follow the edge, head south from the starting area until you find a teleporter pad under a wall decoration of a bearded face. You'll find it near a side passage that drops off downwards. When you get to this teleporter, warp through.
You're now in the southeast of the map, in an armory with four teleportation pads around a central column: beware of the approach to this room's door from the outside, as there's a fake floor that will dump you into lava and probably kill or severely hurt you if you're surprised by it. It may, in fact, be safer and easier to only access this room via teleportation: each of the four pads links this room to another area of the map. You've entered through the north teleport link, and taking the north teleport in this room (the one nearest the door) will take you back to the spot under the face.
The brass key is located in the southwest of the map, in an area isolated from the rest of the map by a lake of lava. You could fly here, but you can also use the armory's teleporter: it's the west teleport link, and the key is right next to the teleport pad. So, warp here, grab the key, warp back to the armory, and then back to the spot under the face decoration.
Head back north to the starting area. Use the brass key on the floor pad and head through the door that opens nearby. Fly across the spike pit and grab the black key. The pull chain here will raise the floor and fill in the spike pit so it's safe to traverse.
Head back to the face and teleport to the armory. Take the south link this time, and head out the door, being wary of the spike pit as you go (you could also head out the armory door, but I find it safer to jump over the pit that can be seen rather than the hidden one.) Either way, head north until you reach a corner. Through the black key door to the east, you'll find the pentagram room. Pull the chain to reveal it, and use flight or fire resistance to collect it safely.
Pentagram in hand, head west until you find the first northward passage, then follow it around the bend to find an open room. Head into it and find the exit chamber so you can escape the insanity of this level.
Tips and secrets:
- If you follow the canyon east, then south from the starting area, you can drop down into a cave with some scrolls and Midian Warriors. There's a hidden lava pit in the middle of this room. This is the east teleport link.
- There's a forked path through a door in the east of the map. The paths are made treacherous by several spike pits. One fork leads to a floor pad and the south teleport link. The other fork leads to the door activated by said floor pad, beyond which is an ambush by Giryon Knights and some goodies: axes of both kinds, a freeze scroll, and a health potion.
- There are two brass keys in this map; if you feel like trying a different route, instead of passing by the dropoff when you head for the teleporter under the face, take a fire resistance potion, then jump down and follow the lava river to some stairs which lead to another brass key room.
Level 12: Crypt of Decay
Up the stairs from the start, you'll find a room with four floor pads that open up side closets with enemies waiting inside. You may want to hit at least the south and east pads to open up the closets which have pull chains; one opens an armory with some nice gear to get yourself up to speed if you're starting this level fresh, the other has what seems like a lifetime supply of fireball scrolls. You might want to toast lots of enemies in this map and return here periodically to restock, unless you're going for a speed finish. Hit the other pads if you're thirsty for battle, then move on.
For the glass key, follow the spiral stairs all the way up and head north to the outdoor ramparts area. You'll find it on the central structure, right by the exit pad, but since you don't have the pentagram yet, you can't leave.
Go back to the spiral stairs and down a floor to the throne room. The glass key door is down a narrow passage next to the bookshelf. Go through and grab the pentagram.
You can now return to the ramparts and leave if you wish, for a quick completion albeit one that misses much of the map.
Tips and secrets:
- In the room with the stockpile of fireball scrolls near the start, jump behind the fire altar to get a cure poison potion and a health potion that might come in handy if you got hit by the imps or trap in this room.
- Step on the throne to open a chamber with a fireball spell and a diamond ring.
- The black key is found on one of the side ramparts of the exit area.
- The black key door is found through the passage behind one of the closets that opens if you hit the floor pads near the start; head to the end of the passage before you turn off (the other fork leads eventually to the throne room). Through the door is a dungeon with a Mino Drake and a measly health potion.
- The brass key is also in the rampart area. When heading there from the spiral stairs, take the right-hand path and go up the ramp.
- The brass key door is in a wooden area that can be conveniently located by going into the passage behind the throne and turning right. Behind this door is a small chamber with a hoard of gold waiting for you.
Notes:
- An interesting map for a couple reasons; for one, it makes much greater use of BUILD's ability to overlap sectors than most of the maps, and secondly, it has several of the patrol point objects that were rarely put to use (the patrol points, however, may not actually function).
Level 13: Mausoleum of Madness
This level looks like an incomprehensible mess from the overhead map, but if you have a good head for landmarks, it's not as baffling as it seems. From the start, head upwards, take the dark passage when there's a fork, and keep going up, finding a two-handed sword along the way, until you get to a watery green cavern containing an ankh. For reference, you can jump up and grab the black key from the small ledge here, but it is optional (and due to a map bug, useless, it seems). From here, follow the watery passage a little further to drop down into the big well.
Immediately through the lowest (and only reachable, without flying) passage out of this well is a wood-and-rock stable-like area. As you enter, immediately turn right and follow the sharp turn into a passage to an area made of a different sort of tan rock. The glass key is on a platform in this area, so jump up and grab it.
Go back to the stable-like area and find an office with a diamond ring on the desk, and a locked door in back that requires the glass key. Through the locked door is a sleeping area where you'll find the pentagram as well as a few coins.
Now that you have the pentagram, go back to the passage where you got the glass key, but this time follow it to its end into a dark grey cavern. The exit pad is right there, and once again you can complete the map while skipping many of the side areas.
Tips and secrets:
- The way to go back up to higher levels after you've dropped down the well is a spiral stairway lined with black rock walls.
- From the top of said stairs, go down the hallway, turn right and then head straight until you find an open room with a weapon enchantment shrine.
- Between the stairs and the aforementioned enchantment shrine can be found another area with a mysterious unopenable door. This is meant to be the black key door, with a hoard of gold on the other side, but due to a map bug, there is no way to get in (the door tag was given to an overlapping sector instead of the correct one.)
- If you fly up in the well, you can find a high opening into a black rock cavern with reflective water on the floor, where red ogres dwell (seemingly their only appearance in WH2). In this area you can find some stairs that lead up to what looks like a teleport pad, but it does nothing, and this time there's no evidence of attempted tagging. There do not seem to be any treasures in these caves either. A very mysterious area.
Notes:
- Another overlap-heavy map. Because of this and other similar characteristics, I strongly suspect that the same designer made both this level and level 12.
Level 14: Gateway Into Oblivion
Right at the start you get an ankh, so charge up and get ready for battle. Now head out into the mines.
Although the automap may look a touch mazey, it's much easier to follow than the previous two. Head to the north part of the map where you find two similar-looking treasure rooms with some stairs down and to the north. Being careful of the lava pit, you can head to the northmost point and collect the brass key. You should be able to make the jumps, barring glitches. Don't miss the ornate horn in this area, either.
Now head to the west area, through the brass key door. There are a lot of traps in this area; don't worry too much about the closing doors, but the fireballs may be a problem. Pull the chains on the walls to open the way down. On the other side of the big room is a balcony where the black key is, jump or fly to get to it. Along with the key, you can stock up on pike axes and fireball, nuke and freeze scrolls.
The pentagram is in the south area, through the black key door. This area is a lot more nondescript, a room with some pillars and lots of barrels, but there are plenty of enemies so don't get careless.
Now loop back around to near the start, drop into the lower passage where you can see the door, and fight your way into the final room. Enter the pentagram pad and prepare yourself for Cirae-Argoth's stronghold.
Tips and secrets:
- Near the start, there's a lowered area with a bunch of fireball scrolls.
- Go through the level counterclockwise. If you go clockwise, not only do you reach the key doors before the keys you need, there's also a blockade that will lower, causing you to have to follow the level in more of a C shape.
- On the approach to the brass key, break the big stained glass to find an ankh.
- In the round central part of the mines, you can find some goodies including a Nuke scroll.

Level 15: Lungs of Hell
A flight spell or two will serve you well in the initial lava area, if you've carried one over. If not, make good use of fire resistance until you can grab the one that's across the tightrope near the start. Don't try to get the two-handed sword without flying; there's a spike hidden under it ready to kill you. Once you're airborne, you can collect the brass key, the sword and the various spells in this area before heading through the passage to the south, which is locked with the brass key.
In the room you eventually reach, the dark floor pad under the invisibility potion will open up a closet full of even more goodies to arm yourself with for the final battle. The other dark floor pad under the health potion will open up the way forward and you can proceed.
When you get past the place with the lava fall, look for a grey door. Go through it and follow the passage until you see a forest of nasty spikes. Touch them and you die, so use your flight spell again and fly well above them. Beyond you can grab an ankh, magic shield, Nuke scroll and glass key, then teleport. This is one-way.
To the north is a door, head through it but be very careful doing so. As soon as you're through the door, head right, not forward, or you'll be caught by a spike trap. You can see where it is afterwards if you go down the stairs. There's another ankh in this room, and also a black key door. Go ahead and try out your Open Doors spell on this one (you should have found a scroll in the lava area near the start). There are some weapons, potions and gold inside. Before you leave, you can also jump on the pillar with the quiver of arrows to open another room with a bunch of pike axes and a fireball scroll.
Head back to the teleport exit (remembering the spikes near the door) and through the glass key door. Carefully follow this passage, there are more spike traps along it. When you come to what seems like a dead end, open it as it is a secret door. Continue on, but again, be careful of spike pits! Finally, there's the black key... aren't you glad you used your spell instead of having to backtrack to that door? The exit from the caves is in sight, too, so head out of the tunnel.
Fight your way up the huge ziggurat to the summit. Circle around the top to find the ivory key, then head inside. Seize the pentagram and... Suddenly you are teleported somewhere else. This is it, Cirae-Argoth's inner sanctum. The very last fight, so don't hold anything back: potions, spells, all your best weapons. When Cirae-Argoth dies, grab the horned skull that she drops and sit back to enjoy your victory, such as it turns out to be.
You have won the game.
Tips and secrets:
- The southeast corner of the starting area contains a niche with some treasure.
- When you get to the big ziggurat, check the back side of it to find some scrolls.
- The castle walls surrounding the ziggurat area aren't just for show, either—fly up there and you'll find lots of goodies as well as some enemies.